http://dispatchfromla.typepad.com/dispatch_from_la/rotdoci.html

Brave Girls Club

Brave Girls Club

Lafiorevida


Labels

Powered by Blogger.

Tuesday, March 1, 2011

Whimsy Girl with Wand

This is the painting that I was talking about yesterday.  I love how she turned out.  I think I'm starting to find my own style.  The background is collaged, painted, stamped and inked.  I drew the girl in pencil and then painted her with acrylics and I also used markers and chalk on her face.  I really wanted to add something 3D to this painting so I constructed a magic wand for her.  I really love her.....
What do you think?  I have to find a place to hang all of my little cuties!! :)  Of course my post wouldn't be complete without a picture of my cookie face ~
She works very hard to keep me company!!!
Gabe (my youngest son) is a wonderful writer and artist.  He wrote a poem for his creative writing class last semester that I just love and wanted to share with everyone.  When he read it to me I was floored with the depth and story within his poem.  He amazes me!

Wolf  Made of Wool
 
A wolf made of wool must travel alone
A wolf made of wool has no home of it’s own
But the birds of a feather
Who fly all together
And raise all their children to never say never
 
One day the wolf made of wool
Found a watering hole
He told all the birds his heart wasn’t full
Cause there’s no home in the world for a wolf made of wool
When he saw them all laughing
He looked at the water and looked at it deep
No wolf made of wool but a smiling white sheep
Gabriel - January 2011

Monday, February 28, 2011

My Whimsy Girls

I have been stepping out of my comfort zone with two new techniques - working on canvas and with paper clay.  I am just loving all of the whimsical girls that I am creating with the new things I have been learning.  They are so much fun to create!!  Everything takes a bit longer with these techniques and I don't finish things in one sitting but that has also been fun for me.  I'm usually kind of impatient and working in this way is challenging but I am enjoying the process a lot more now.  Maybe I'm just getting older???

For the canvas projects I begin with a collage of scrapbook papers, dictionary pages or music sheets.  After everything is glued on I do a wash with white paint or a colored paint.  I have discovered the cool effect you can achieve with watered down paint so that you can still see a bit of the back ground.  I just love this technique!!
I used copies I made from my sketchbook for both of these pictures.  I picked sketches that I liked, made copies and then cut them out.  The girl with the purple hair is from a class I have been taking called Fabulous Faces.  I made a black and white copy so that I could cut her out, paste her on the canvas and then paint over the drawn lines.  The flying girl was just a fun sketch that I made and fell in love with her sweet face.  I copied her in color and then glued her on the canvas that I created.  I am working on another one right now that I'll show you very soon.  I'm excited about how the new one is coming out!!

The other thing I have been working with is paper clay.  I just love paper clay!!  It air dries and is so much fun to mold.  It is very soft and much easier for me to work with than polymer clay.  I like polymer clay but it takes a while to condition to make it soft and my fingers just get too tired.  

The girl with the blue shirt was created while I was taking Folk Art Doll Workshop by Moriah Betterly.  Her dvd had so much great information and is very easy to follow.  Her cute dress is made from dictionary pages that are cut into strips, curled and then glued on to her body.  I really enjoyed creating her and that is what led me to make the girl in pink and orange.  I am going to create lots more with this technique!  I am hooked!!

I have to leave you with a picture of what my little buddy was doing while I was taking pictures and working on this post ~

Wednesday, February 23, 2011

Talent & Inspiration!!

I want to post (and brag) about my nephew, Matt!!  He is a very talented drum player and is already playing professionally!!  I'm so proud of him that I just need to take a minute and share this with everyone.  Matt has been playing drums for years now - practicing, taking lessons and even competing in state competitions.  Matt and his friend Jeremiah have been playing at a restaurant in Chicago called Reza's Restaurant.  Jeremiah is a very talented musician who also happens to be blind.  They play jazz on either a Friday or Saturday night at Reza's.  Here are some pictures of them:

I'm so impressed that they work so hard to be able to play professionally at their ages.  Matt is only 15!!  I also want to mention that it takes really wonderful parents to get to this level as well.  You really need to stand behind your kids with encouragement - financially and with your own time!!  I can't wait to see what the future holds for these young men.....

Monday, January 3, 2011

Mmmmmm.....Tuna Casserole

My stepmom, Cath, makes the best tuna casserole in the world!  It is my absolute favorite!!  I've been asking her for her recipe for a few years and she kept putting it off.  This Christmas she gave me a special little box all wrapped up and inside it was her special tuna casserole recipe handwritten especially for me!!  I was sooooo happy!  I made it for my family tonight and it turned out perfectly.  It tasted exactly the same way she makes it!


As you can see - my husband really enjoyed it too!!  Thank you, Cath!!
 
I also have a new picture to share.  She is made with watercolor paints, colored pencil and copic markers.  I like orange and pink together lately - so bright and cheerful!! Do you like her?  I'm having so much fun making these cute girls. 

Sunday, January 2, 2011

Whimsical Girl Collage

Last night I worked on a project I saw in the book, Taking Flight by Kelly Rae Roberts.  I love her work!  I've been practicing my drawing by having her book open and trying to draw the ways she does.  I know that is kind of copying but I need to figure out how to draw things first before I can make them my own.  Hopefully that will come in time.  She has this project in her book that starts with a blank canvas and then you collage the entire surface and add a white wash on top of that to make the colors a little more subdued.  After I did those things I inked up spots here and there with distress inks to give it a little more interest and worn out look.  I then sketched the girl on top of that and painted her with watered down paints.  I love that part (the watered down paints) because you can see the collage underneath and it really makes it look very interesting.  I went back and outlined her a bit more with black pencil and touched up her face a bit.  She turned out so pretty!  I just love, love, love this project!!  It  turned out just as I hoped it would.  I even went out to the craft store to buy more canvases to do another girl because it was so much fun!!  Take a look:

I can't wait for my Mom to see this painting.  My son, Ben, told me that it was really nice and that it looked like something Grandma would make!  She is very talented so I thought that was a wonderful compliment!!

Friday, December 31, 2010

Happy New Year!

Happy New Year!  I can't believe it is already 2011!!  I was just remembering when the year 2000 came around and everyone was freaking out.  Remember?  People were buying supplies and thought the computers were going to crash and it was going to be chaos?!?  Lol!  The clock hit midnight and nothing happened ~ we all lived thru it! 

I was thinking that this year I wanted to make some resolutions for myself.  I usually don't bother because I never follow thru with them but I'm feeling extra motivated and positive about things.

1.  Blog more often - at least once a week.
2.  Spend $20 or less for our family dinners every night.
3.  Make a house cleaning schedule and stick with it.
4.  Use coupons more often.  Maybe at least one every time I grocery shop (minimum). 
5.  Art Journal at least once a week (hopefully a little each day at the very least). 

I think that is a good start.  I hope that next year when we approach 2012 I can come back to this post and say that I stuck to all five of my resolutions.  Wouldn't that be cool?? 

I signed up for two Art Journal adventures online.  I put the little button for each one at the right side of this page if you want to check them out.  I'm so excited and I think that being a part of a group with keep me motivated and inspired. 

I am in an art journal round robin right now.  Here is a picture of the pages I just finished for one of the group members.  I just love working in these journals. 
Today I started my own journal for 2011.  This is the first page:
I think I might go back down to my craft room and work in my art journal a bit more because I'm not sure I can handle all of the excitement at my house.  Here are a couple of pictures of what is going on at this very moment at my house (keep in mind it isn't even 8pm!!):

Have a wonderful New Years Eve and I'll blog again soon!! 

Friday, November 5, 2010

Felted Pumpkins

I was just thinking that I forgot to show you the pumpkin that started it all!  My friends and I took a really cute class that I talk about in the next post and here is the link to the actual class & a picture of it: Pumpkin Patch

The big pumpkin is the one we made in class.  The smaller one I made at home but didn't have the same colors so it looks a bit different.  The witch is cute too, right?  I bought a download from: Seneca Pond Crafts.  You just print her out, cut, glue and embellish.  I had tons of fun with her!! :)


Cute, right?

Snowmen - clay & wool!!

I just want to show you a few things that I have been playing with.  My friends and I went to a needle felting class at the St. Charles Library.  Here is the link to the class description and the picture of us taken by the the instructors, Wool & Co.
The three of us got together to go shopping for wool at the Wool & Co. (of course!).  What a beautiful store!  We were thinking about the holidays and making snowmen, santas, etc.  I took two foam balls and needle felted white wool on each ball and then attached them with a toothpick and glue.  I crocheted a quick red scarf for my cutie pie and added a carrot nose, top hat (with gold wrapped around it), red brads for buttons & black glittery eyes.  I think I might add branches for his arms and maybe some snow on the rim of his hat too?  Look at what I have so far -
This has nothing to do with snowmen but I also made this little black bird by needle felting wool.  He turned out pretty good for my first wool sculpture creature! :)

I think I'm going to put a black bead in the eye and then he'll be done.  It is really a fun and easy hobby that you can do while you are sitting on the couch watching television.  Isn't he cute?

Okay, I also made a snowman head with paperclay.  I showed him in an earlier post.  I don't think I'm quite done with him and need to add something to the head so we can hang him on the tree.  I am thinking about a curly wire thing to add a bit of whimsy.  I painted him and added chunky glitter to look like an older vintage ornament. I also took crepe paper to make a collar and painted glue on the edge and put fun silver glitter around the edges. Take a look -

Here is a picture of the three characters together:


And just for fun, this is what Carly does while I'm crafting or taking pictures! Lol! 


Tuesday, November 2, 2010

Cork Message Board

I have been rearranging and organizing our basement.  We have a finished basement and it is a good size but it is full of "stuff"!!  The two boys have desks with computers on them and I moved them so that one half of the basement would be like a little family room with the couch, tv, and desks.  It really looks good this way.  So far anyway....  I wanted to personalize the space for the boys a little bit so I thought about making cork message boards to put above each desk.  I had envisioned making them very personal to each kid but ended up making them the same and they match what I want the decor to be down there.  First, I'll show you the boards and then I'll show you how I ended up making them more personal.


This is the starting cork board.  I bought them from Wal-Mart for about $8 each and they are really big.

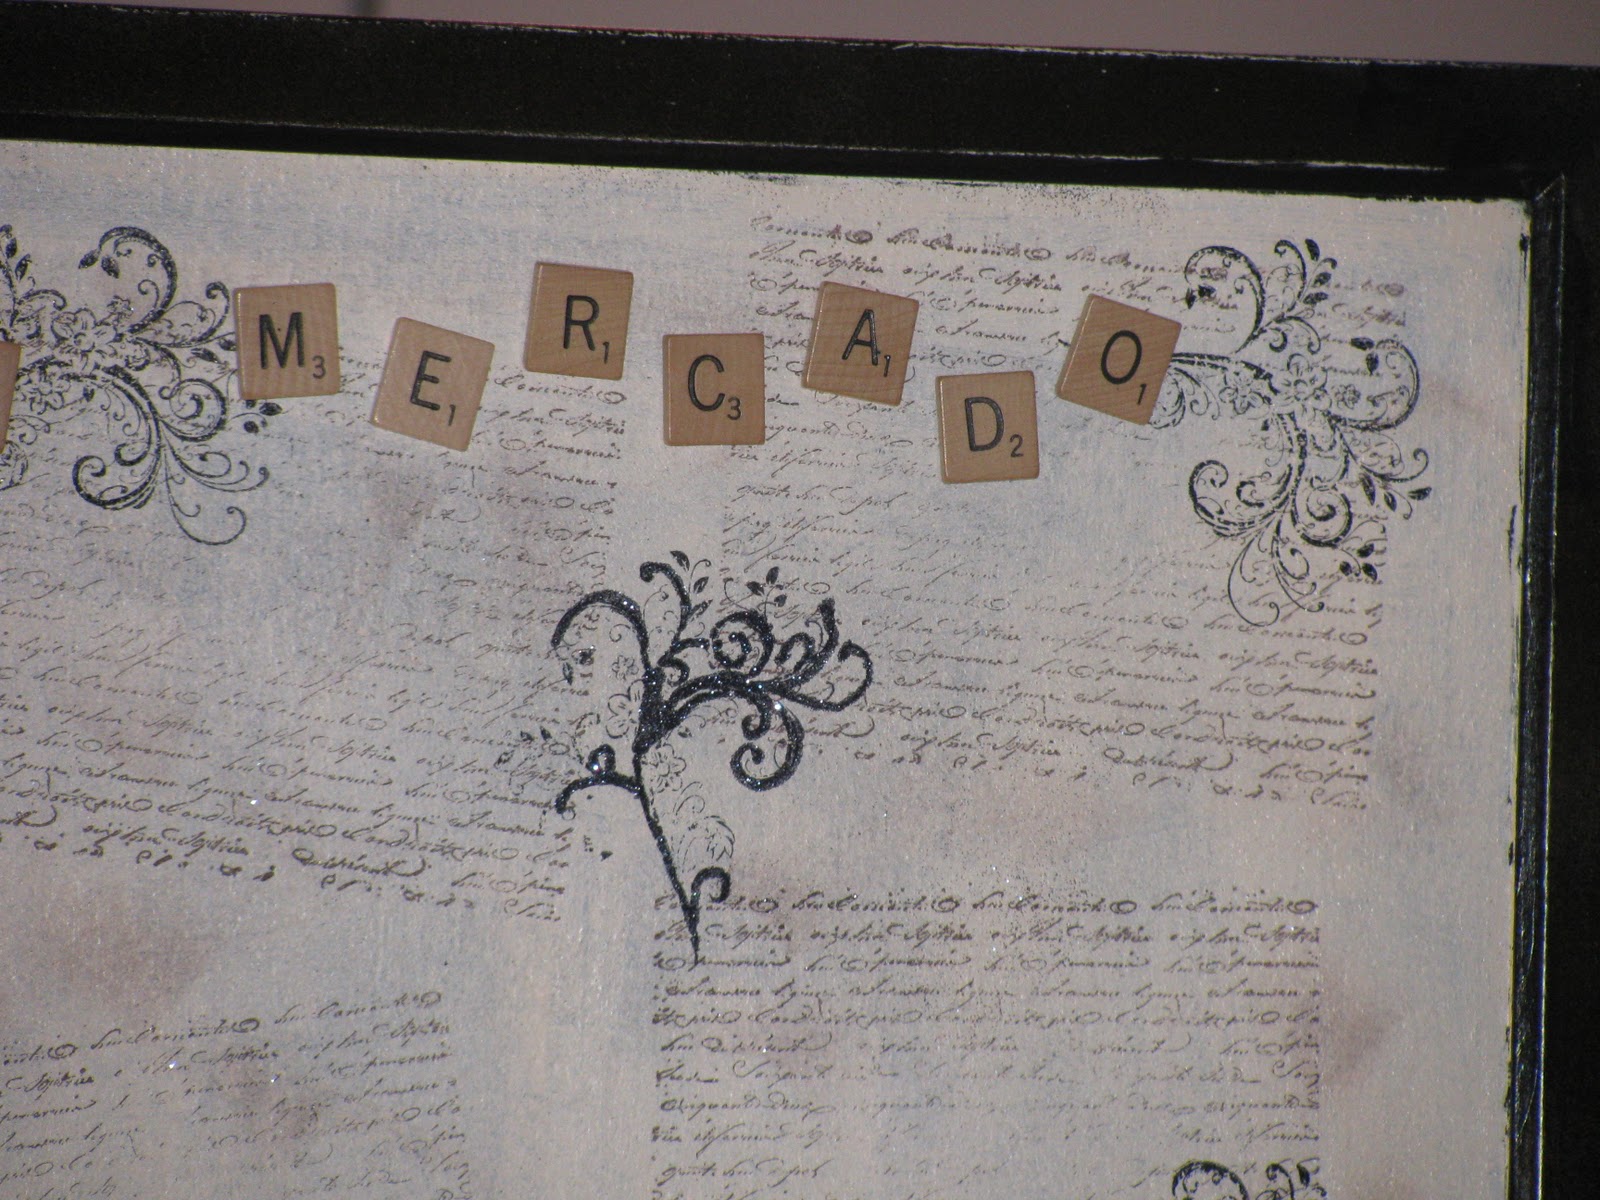
 You can see on the second picture that I sanded the wood frame.  After sanding the frame I painted a light base coat and then a dark top coat.  When the frame was dry I lightly sanded random edges so that it would look distressed.  It really worked well because the light color didn't sand away and really popped against the dark color.  Next, I painted the cork a really light color - kind of a creamy linen color.  I then stamped randomly with a script stamp in brown, a flourish stamp in black and then sponged brown all over to make it look a little bit aged.  One of them I used a glue pen and put black glitter on the flourishes and the other I left plain.  I prefer the plain one and kind of wish they were both like that.  Live and learn, right?  For the finishing touch I sprayed a clear gloss over the entire frame and cork board for protection against teenage boys (if that is possible?!?).   


To add a little personalization I had a brilliant idea!!  Lol!  I took out my bag of Scrabble tiles and found letters to make each boy's full  name.  Boy, I gave those kids loooooong names!!!  I had to take out my game that I keep to play with the complete the names!  Now, I have to buy some replacement letters.  It was worth it though.  Gabe helped me find the letters and when we had everything we glued flat tacks to the backs of the tiles to make personalized pins!  I used Crystal Effects for the glue because it will hold anything - it is super strong.  We let it dry about an hour before we put then on the cork boards.  Here are close-ups of the names.  You'll see what I mean about the boys having really long names!! 


If you want to make your own scrabble tile tacks I added a couple of close-up pictures so you can see what I did.  They are super easy and super cute!!

 I'm so proud!  Weren't the Scrabble tiles a great idea?  You could probably do that with anything!!  Magnets on the backs would be really cute too.  What do you think?


Thursday, October 28, 2010

Paper Clay Ornaments

I started playing with paper clay.  I wasn't even sure what it was.  Is it clay?  Is it paper mache?  I think it is a cross between the two.  I keep seeing really fun doll faces and ornaments made from paper clay so I have been trying to figure it out.  I went to the store and I couldn't find the black package of paper clay that I saw on the internet and I was getting discouraged.  I dropped something and when I bent down to pick it up there it was!  On a bottom shelf shoved way back!!  One little package of paper clay in a black package! I snatched it right up like a greedy little kid.  There was no one around me so I'm not sure why I was acting like that!?!  Lol!  It is the coolest thing ever!  I'm in love with it!!  It is so soft and easy to use.  I even found a recipe for it online so that I could make it for myself at home.  Paper Clay Recipe  Take a look at this site - she has lots of information and her videos are so useful!!  I'm going to try to make it very soon because I already used up the package I bought.  Here is a picture of what I working on:

I made two of the one that is round and has the cone shape sticking out of the front.  I'm going to make a snowman face with painted eyes and a coal smile.  One I'll cover in chunky glitter (like snow) and the other I'll do a crackle finish (like an antique style ornament).  I wanted to see which type I liked better and which turns out nicer.  I'll post again when I get them painted and add the finishing touches.  Do you the like creepy toothy smile on the snowman head in the middle?  He is my favorite!!!!

Wednesday, September 29, 2010

Handcrafted ring swap

I was recently in a swap for handcrafted rings.  The swap was to make two rings for each of our two partners.  I just discovered making this kind of jewelry and it is so much fun!  It did take me a long time to think of designs because I have never made rings before.  I loved the whole process!  Take a look -

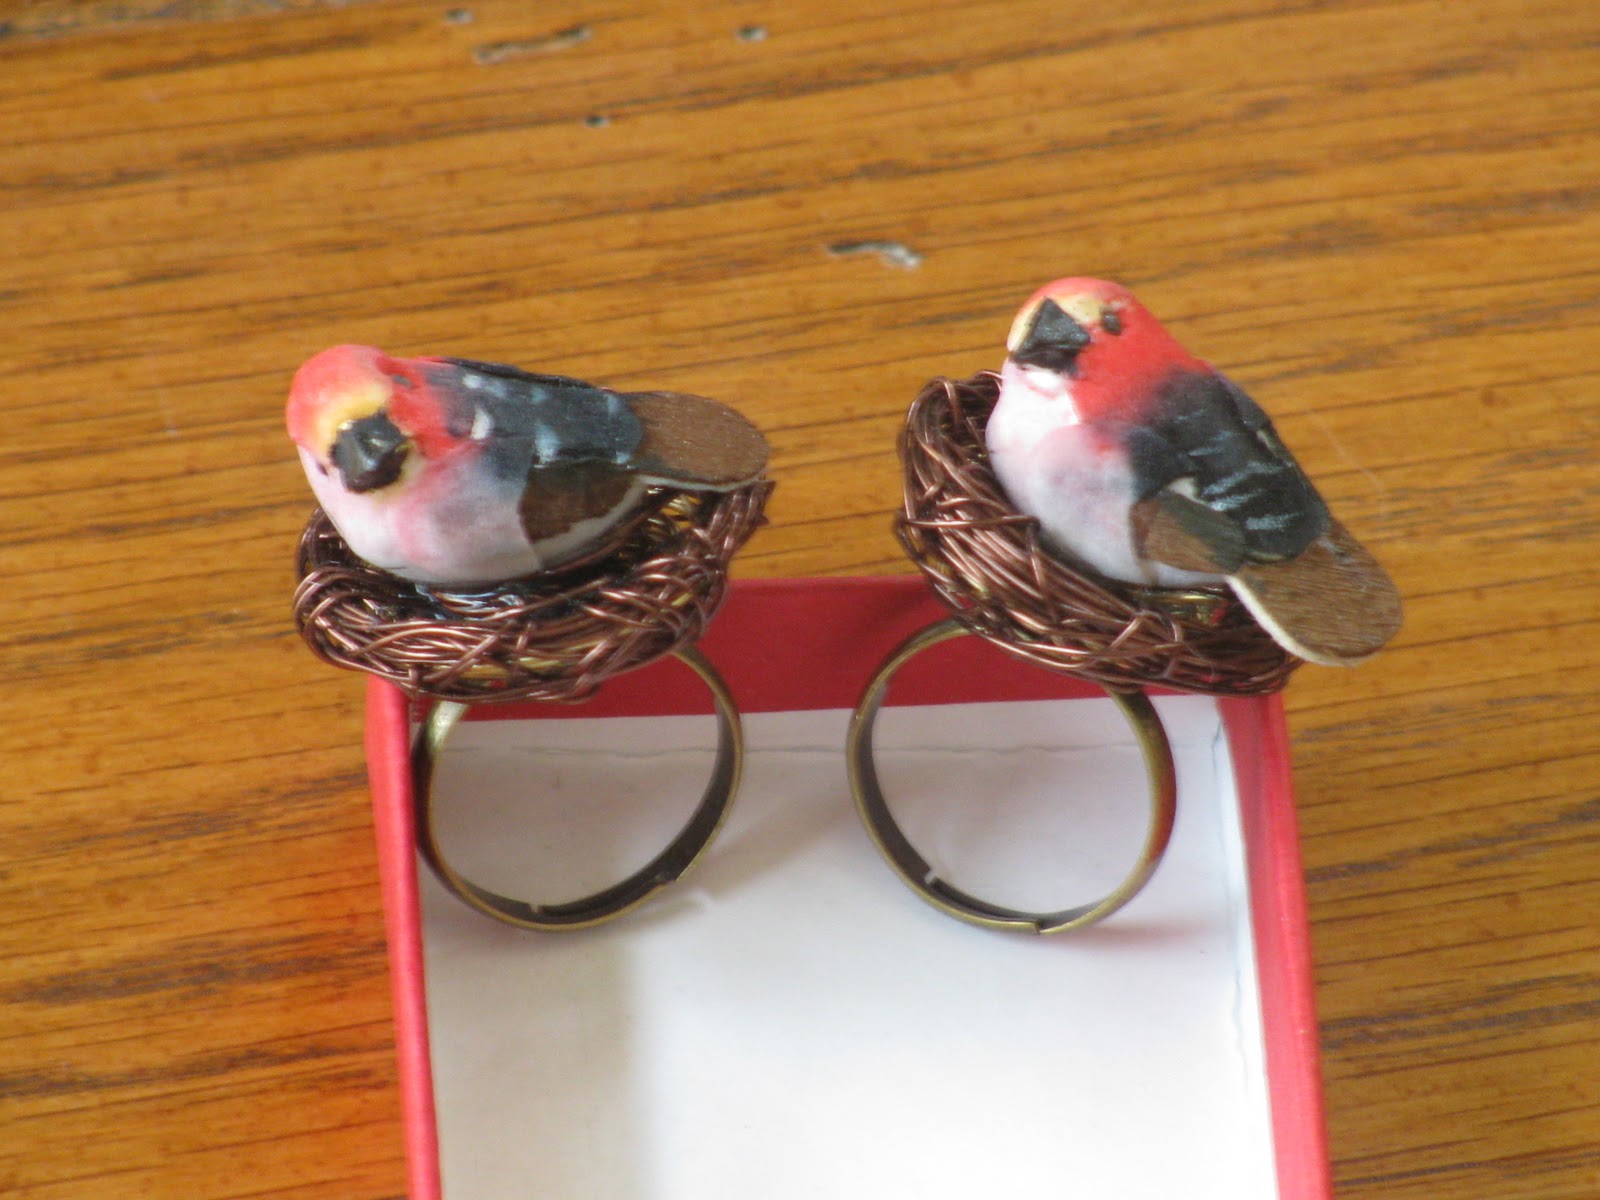
For this one I used wire to make a nest and then added a bird to it and attached it to the base.  Easy but so cute!!  I love birds and I just wanted to make a fun ring that was a bit unusual.  
These rings are made from memory wire.  I didn't realize they made memory wire for rings but it is really cool because you don't have to worry about the size of the ring.  The beads just roll over your fingers and the rings fit very comfortably.  I put half of the clear beads on and then a focal bead and then the last half of the clear beads.  So simple and easy!
More pictures:


What do you think?  I was really proud of them and had a hard time sending them away!! :)